FJR Valve Adjustment

Tech section strictly for the FJR. Everything from oil changes & suspension setup's to removing sheep hair from hard to reach places on the bike so that your wife never finds out.
User avatar
FJRoss
Veteran
Posts: 2433
Joined: Sat Apr 14, 2018 7:41 pm
FJRModel: 2011 FJR 1300
2017 BMW F700GS
Location: Fredericton NB (Canada)
x 703
x 2130

Re: FJR Valve Adjustment

Post by FJRoss »

Festus wrote: Tue Jun 14, 2022 7:42 am Most any measuring tool is only accurate if you calibrate it, and calibration requires controls. Opening a package from Harbor Freight and using it immediately and preaching that your measurement is highly accurate because the digital readout says so isn't the best procedure for producing accurate results :) Oh, and add the fact that you measured them when it's 90 degrees outside :)
I was surprised with the accuracy (and repeatability) of my relatively inexpensive digital caliper. Technique is important!
Make sure caliper jaws and surfaces of the object being measured are clean
Using the same (light) pressure you are using to measure, set the zero on the caliper
Check it at least twice.
Check the accuracy and repeatability of your technique (as well as the caliper) using your shims, feeler gauges or anything of known dimension.
Measure shim, rotate it 90° and measure again
If repeated measurements differ, reset zero and measure again
Measure at the edge and across the middle to make sure thickness is uniform
Do not use the tips of the caliper jaws if you "calibrated" in the middle.
Try to use the same pressure with each measurement
Check zero often and wipe surface of jaws regularly
Temperature may be a factor so do your checking at the same temperature you do your measurements

Sounds like you have to do a lot of measuring and checking but it really doesn't take much time.

For what its worth, I do all measurements in metric rather than imperial. Equal accuracy is possible in either case but the user has to realize that there is a LARGE difference between 0.006" and 0.007" - more obvious when you compare 0.152 mm to 0.178 mm. You really need to consider at least two significant digits in these measurements (zeros after the decimal are not significant digits).
User avatar
Festus
Contributor
Veteran
Posts: 4413
Joined: Tue Mar 28, 2017 3:40 pm
FJRModel: 2013 FJR, 2023 KTM 390 Adventure
x 3770
x 9706

Re: FJR Valve Adjustment

Post by Festus »

Exactly, accuracy with calipers is all about feel and pressure. Those things have to be learned, or better, taught and learned. It's just funny to me because some of the cheap calipers say "Accuracy +/- .001", then you have people saying they are reliably measuring things to .0005" :) Ummm....no....no, you're not :) You might be getting the same number every measurement but without calibration, that number is meaningless.
HotRodZilla and wheatonFJR loved this
"That wasn’t as bad as I thought it would be" - 1911

"Stay thirsty, my friends"....... Wouldn't that mean I'm dehydrated all the time?
User avatar
fontanaman
Contributor
Veteran
Posts: 3075
Joined: Fri Mar 08, 2013 9:38 pm
FJRModel: 2017 FJR, 2017 DR650
Location: Spokane, Washington
x 3070
x 4229

Re: FJR Valve Adjustment

Post by fontanaman »

Panman wrote: Tue Jun 14, 2022 1:04 am Jim, I always use a product called Right Stuff. When it sets it is as rubbery as the original gasket material, I use it sparingly to set the gasket into place on the valve cover and let it sit over night. Same gasket is in place at four valve checks now and never a problem. Used the same process on the S-10 which make the FJR look like a cake walk.
Thanks. I have the gasket installed using Three Bond. My gripe about installing the cover is lack of clearace. I know S10s have worse clearance issue with some guys dropping the engine a bit.
HotRodZilla loved this
User avatar
fontanaman
Contributor
Veteran
Posts: 3075
Joined: Fri Mar 08, 2013 9:38 pm
FJRModel: 2017 FJR, 2017 DR650
Location: Spokane, Washington
x 3070
x 4229

Re: FJR Valve Adjustment

Post by fontanaman »

I considered sanding the shims but with only a dial caliper I decided against it. I wasn't sure my caliper or I were good enough. FJRoss thank for shim sanding suggestion.
User avatar
FJRoss
Veteran
Posts: 2433
Joined: Sat Apr 14, 2018 7:41 pm
FJRModel: 2011 FJR 1300
2017 BMW F700GS
Location: Fredericton NB (Canada)
x 703
x 2130

Re: FJR Valve Adjustment

Post by FJRoss »

fontanaman wrote: Tue Jun 14, 2022 12:48 pm I considered sanding the shims but with only a dial caliper I decided against it. I wasn't sure my caliper or I were good enough. FJRoss thank for shim sanding suggestion.
After thoroughly cleaning and degreasing the channel in the cover and the gasket, I used a bit of Permatex grey (O2 safe) silicone in the channel to "glue" in the gasket. I used very little and made sure any excess was wiped off. Let it dry well. This holds the gasket while trying to maneuver the cover back in place. (Never used the Three Bond but expect it is similar.)

For a Gen II, it helps to loosen the throttle cables at the grip and swing them out of the way - not sure about Gen III+ with throttle-by-wire. I have the block-off plates for the PAIR system - nice to NOT have to deal with the plumbing!

Get yourself an inexpensive digital caliper (and keep a spare battery because they wear out at the worst possible times). I have used Vernier scale as well as dial calipers but like the digital better. Nice to be able to switch back-and-forth to Imperial (if needed).
Hppants and fontanaman loved this
dcarver
Contributor
Veteran
Posts: 941
Joined: Wed Jan 23, 2013 12:18 am
FJRModel: Gen2, Superior 2006, Gen 3 2013 twice as good!
x 107
x 1453

Re: FJR Valve Adjustment

Post by dcarver »

This might help
https://candybuttorg.ipage.com/cba/node/720

Valve cover install... be sure the rubber block in valve cover over cam sprockets is tight... mine got knocked loose, fell down tower, wrapped around crank gear, freaked me out, kept me up all night figuring how to un-jam it. Sigh.

Image

Other helpful tidbits

Removed water inlet pipe. Had crud still, even after initially blowing area with compressed air. Hmm, what now. Hey, a 17 mm fits the hole perfect! Used suspension cleaner and compressed air, nothing got into the water jacket area.
Image

Cam timing hint. Marked both gears. The ruler is laying across the flats, (not the case cover flange) and is UNDER the marked tooth.
Image

Slotted CCT bolts for ez-pz install
Image

Cleaned up 'flashing' on CCT frame hole to allow lower cap screw and hex with tape to pass through. EzPz.
Used a Dremel and file to slightly widen the opening. Now my frame will flex, frame will break and all kinds of bad joo-joo will happen. NOT.
Image

Thanks for the trip down memory lane and Good Luck!
Hppants, FJRoss, and fontanaman loved this
User avatar
FJRoss
Veteran
Posts: 2433
Joined: Sat Apr 14, 2018 7:41 pm
FJRModel: 2011 FJR 1300
2017 BMW F700GS
Location: Fredericton NB (Canada)
x 703
x 2130

Re: FJR Valve Adjustment

Post by FJRoss »

dcarver wrote: Tue Jun 14, 2022 1:54 pm
Cam timing hint. Marked both gears. The ruler is laying across the flats, (not the case cover flange) and is UNDER the marked tooth.
Image
I like your method of marking the cam sprockets - I will remember that. What did you do at the crank to make sure the chain didn't move?
User avatar
fontanaman
Contributor
Veteran
Posts: 3075
Joined: Fri Mar 08, 2013 9:38 pm
FJRModel: 2017 FJR, 2017 DR650
Location: Spokane, Washington
x 3070
x 4229

Re: FJR Valve Adjustment

Post by fontanaman »

Hi Don,

Thanks for the complement. Trying to read the marks on the cam sprockets is near useless as the frame is in the way so using red mark was one way to know if it moved. If it moved that would count as a bad thing.

Here how I used a wire tie to keep the cam chain in place. It worked very well. The upper tie didn't do anything. The lower one did the job and it was located just at the bottom of the chain guide. The upper tie didn't work out because the chain guide was in the way. Later after relieving the CCT I put a tie up higher when I could get the tie between the chain and the chain guide but then I couldn't remove the camshaft.

Image


Today's Update

Today did not go to plan. The Three Bond holding the valve cover gasket in place let loose during a failed attempt to install valve cover.

Went to the hardware store to by Permatex Right Stuff as suggested by Panman. The good news for the day is I had an spare valve cover gasket laying around. So I have just finish cleaning Three Bond from the valve cover. Letting it dry right now.

Due to this delay and my shims arriving tomorrow, a day early, I will likely remove the camshaft one more time and replace the shim in 2 left.

I like Don's idea of cutting a slot in the CCT plug bolt. The shims and the pencil magnet I ordered are coming via USPS and I hope they arrive concurrently.
User avatar
Hppants
Contributor
I post more than I ride
Posts: 6350
Joined: Wed Oct 19, 2016 9:22 pm
FJRModel: 2021ES
x 12237
x 10706

Re: FJR Valve Adjustment

Post by Hppants »

Slot in the CCT bolt is a must.
wheatonFJR loved this
"I guess it comes down to a simple choice, really. Get busy living. Or get busy dying."
- Andy Dufresne, Shawshank Redemption

Image
User avatar
raYzerman
Contributor
I post more than I ride
Posts: 9224
Joined: Mon Mar 18, 2013 10:49 am
FJRModel: 2016 Versys 1000 Titanium Devil, 2014 DL1000, 1999 VFR 800 Bumble Bee
Location: Millgrove, Ontario, CA
x 2876
x 10703

Re: FJR Valve Adjustment

Post by raYzerman »

I always slot the CCT bolts...
On Gen3, there is a very narrow window to get the valve cover in.... hard for me to describe how to do it.... you will be scraping the half moons over the cam chain/sprockets, just as long as the rest of the gasket is glued in place you'll be fine. Before you seat the valve cover down, use a wee dental pick to ensure the half moons are where they're supposed to be, should you need to tweak one or two...

Invest in a micrometer rather than calipers, even a cheap digital one...... to me, calipers rather useless for this kind of stuff.
fontanaman and wheatonFJR loved this
Keep yer stick on the ice........... (Red Green)
Duct tape can't fix stupid, but it can sure muffle the sound.
User avatar
FJRoss
Veteran
Posts: 2433
Joined: Sat Apr 14, 2018 7:41 pm
FJRModel: 2011 FJR 1300
2017 BMW F700GS
Location: Fredericton NB (Canada)
x 703
x 2130

Re: FJR Valve Adjustment

Post by FJRoss »

raYzerman wrote: Tue Jun 14, 2022 11:09 pm I always slot the CCT bolts...

Invest in a micrometer rather than calipers, even a cheap digital one...... to me, calipers rather useless for this kind of stuff.
+1 on the CCT bolts.
We may have to agree to disagree on the digital caliper vs micrometer in this application. Each has its place and there is NO question that the micrometer is capable of more accurate and precise measurement in the hands of someone who knows how to use it. I am just saying that a decent digital caliper (if used correctly) is capable of providing sufficient accuracy for measuring the thickness of valve shims.

I also have a micrometer that I use (rarely) when better accuracy is needed but I will use the digital caliper at least nine times out of ten.
fontanaman and N4HHE loved this
User avatar
Festus
Contributor
Veteran
Posts: 4413
Joined: Tue Mar 28, 2017 3:40 pm
FJRModel: 2013 FJR, 2023 KTM 390 Adventure
x 3770
x 9706

Re: FJR Valve Adjustment

Post by Festus »

Ross, keep in mind, you are coming from a technical, engineering background. Most people who buy calipers aren't comfortable even understand decimal equivalents of fractions, or even knowing what 1/64" or 1/32" even is. Having said that, those same people would treat a micrometer like a C-Clamp :)
"That wasn’t as bad as I thought it would be" - 1911

"Stay thirsty, my friends"....... Wouldn't that mean I'm dehydrated all the time?
User avatar
FJRoss
Veteran
Posts: 2433
Joined: Sat Apr 14, 2018 7:41 pm
FJRModel: 2011 FJR 1300
2017 BMW F700GS
Location: Fredericton NB (Canada)
x 703
x 2130

Re: FJR Valve Adjustment

Post by FJRoss »

Festus wrote: Wed Jun 15, 2022 9:24 am Having said that, those same people would treat a micrometer like a C-Clamp :)
I'm certain that Ray is not in that category.

Still, I agree with you that the best measuring device in the world is worse than a tape measure in the hands of someone who doesn't know how to use it (or handle/store/calibrate it properly). I know someone that doesn't dial the tension off his clicker torque wrenches and stores them in a hot/humid (or cold/damp) garage. He wonders why one of his went "bad" (wouldn't click anymore) and why I only use my own... :roll:
User avatar
Hppants
Contributor
I post more than I ride
Posts: 6350
Joined: Wed Oct 19, 2016 9:22 pm
FJRModel: 2021ES
x 12237
x 10706

Re: FJR Valve Adjustment

Post by Hppants »

On the Gen 3, disconnecting the throttle cables from the throttle tube and removing the throttle cable bracket at the motor definitely helps with maneuvering the cam cover into place.
FJRoss loved this
"I guess it comes down to a simple choice, really. Get busy living. Or get busy dying."
- Andy Dufresne, Shawshank Redemption

Image
User avatar
FJRoss
Veteran
Posts: 2433
Joined: Sat Apr 14, 2018 7:41 pm
FJRModel: 2011 FJR 1300
2017 BMW F700GS
Location: Fredericton NB (Canada)
x 703
x 2130

Re: FJR Valve Adjustment

Post by FJRoss »

Hppants wrote: Wed Jun 15, 2022 12:51 pm On the Gen 3, disconnecting the throttle cables from the throttle tube and removing the throttle cable bracket at the motor definitely helps with maneuvering the cam cover into place.
Thanks. I knew it made a big difference for Gen II bikes. I will keep it in mind in case I ever get a Gen III.
User avatar
fontanaman
Contributor
Veteran
Posts: 3075
Joined: Fri Mar 08, 2013 9:38 pm
FJRModel: 2017 FJR, 2017 DR650
Location: Spokane, Washington
x 3070
x 4229

Re: FJR Valve Adjustment

Post by fontanaman »

Thanks for all the feedback. I like FJRoss' idea of getting a metric feeler gauges.

I am surprise nobody commented on the idea of using a thin telescoping magnet to install the CCT plug. This will arrive on my doorstep today. I am eager to give it a go. If the magnet doesn't work I will cut a slot on the plug.

Image
User avatar
FJRoss
Veteran
Posts: 2433
Joined: Sat Apr 14, 2018 7:41 pm
FJRModel: 2011 FJR 1300
2017 BMW F700GS
Location: Fredericton NB (Canada)
x 703
x 2130

Re: FJR Valve Adjustment

Post by FJRoss »

I didn't find the CCT plug all that difficult to install. The CCT bolts are much worse and the slot really helps for these.

I have a telescoping inspection mirror that has a magnet on the other end.
User avatar
raYzerman
Contributor
I post more than I ride
Posts: 9224
Joined: Mon Mar 18, 2013 10:49 am
FJRModel: 2016 Versys 1000 Titanium Devil, 2014 DL1000, 1999 VFR 800 Bumble Bee
Location: Millgrove, Ontario, CA
x 2876
x 10703

Re: FJR Valve Adjustment

Post by raYzerman »

I you remove two screws from the cable bracket at the TB's you can get the throttle cables out of your way.... no undoin' nuthin else is needed. Now that freaking wire harness is another fun piece.
fontanaman and FJRoss loved this
Keep yer stick on the ice........... (Red Green)
Duct tape can't fix stupid, but it can sure muffle the sound.
User avatar
fontanaman
Contributor
Veteran
Posts: 3075
Joined: Fri Mar 08, 2013 9:38 pm
FJRModel: 2017 FJR, 2017 DR650
Location: Spokane, Washington
x 3070
x 4229

Re: FJR Valve Adjustment

Post by fontanaman »

Today I removed the camshaft and installed one shim to increase the tolerance from .006 to .0075 (loose 7 tight 8). Reinstalled everything. The valve cover is a PITA. No clearance at all. The gasket dog ears drag across the chain. The gasket came loose above the chain but I the valve cover installed and used and inspection mirror to assure the gasket was properly in place.

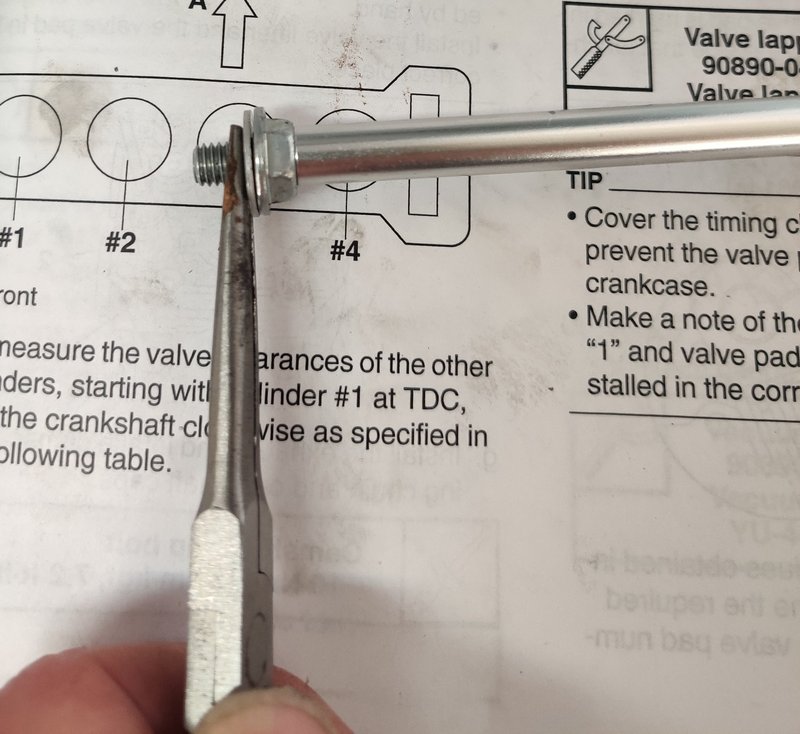
This worked like a champ putting the CCT plug bolt in place. A needle nose pliers and a thin pencil magnet. The magnet fit perfectly in the recessed part of the bolt head. One try and in it went.

Image

Tomorrow I will add engine coolant, install air induction system, gas tank and fire it up, then sync the throttle bodies. At least that is the plan.
wheatonFJR loved this
User avatar
fontanaman
Contributor
Veteran
Posts: 3075
Joined: Fri Mar 08, 2013 9:38 pm
FJRModel: 2017 FJR, 2017 DR650
Location: Spokane, Washington
x 3070
x 4229

Re: FJR Valve Adjustment

Post by fontanaman »

Valve adjustment successfully complete. All that remains is to wash it and take it for a shakedown ride. Wahoo!
Hppants, escapefjrtist, FJRoss and 2 others loved this
Post Reply