Tips and Tricks I’ve Learned Regarding Valve Checking and Re-Shimming on the FJR
These tips are given in sequence of how the job is done. This is not meant to be a substitute for following the Service Manual. But rather, some things that I’ve learned along the way that will help the inexperienced person.
1. Parts and materials you will DEFINITELY need:
a. Cooling pipe O-rings (2 each)
b. High-temp RTV gasket maker
c. Coolant drain bolt brass washer
d. Pre-mixed coolant (3 quarts)
e. Di-electric grease (small packet)
f. 10” piece of 2 x 4 lumber.
g. 1” wide stiff putty knife
2. Parts and materials you MIGHT need:
a. Timing cover gasket
b. Spark plugs – Note – you might as well change the plugs every time you go through this.
3. Check your valves with a low amount of fuel in the tank. It’s easier to handle it 45 pounds lighter.
4. After removing the heat shield, T-Bar, and PAIR system, use a permanent marker to label the cylinder numbers for each coil/spark plug boot.
5. The coil/boots will be “stuck” into the cam cover if this is the first time you are removing them. First, rotate them back and forth, then gently wiggle them a little to loosen. Then, use your putty knife to gently pry the boot against the cam cover. On re-assembly, put a film of di-electric grease on the boot mating surface and you won’t have the problem again.
6. If you have a shop vac, rig up a small (1/4”) plastic tubing to your hose. You can use this small hose to suck up all of the little pebbles/grit/dirt that has found its way into the cracks and crevices of the cam cover (spark plug holes, cooling pipe recess, etc). You are about to open the motor – let’s keep things as clean as possible.
7. Don’t be surprised of the allen socket bolts for the cooling pipe are slightly rusted. For this, make sure that your allen socket (better than a wrench) is new and decent quality for a tight fit. When you loosen these bolts, push slightly down on the socket (compresses the o-ring to make it easy to loosen), and concentrate on not allowing the tool to get off center. Obviously, if you round off this fastener, it’s going to be a total PITA to deal with.
8. For removing the coolant hose (coming from the thermostat), use an 8mm ¼” drive socket and rachet. After the cooling pipe is removed, rotate the hose clamp 180 degrees. This will make re-assembly easier, and from now on, you won’t have to be a contortionists to get to that clamp.
9. Remove the screws that hold the hardware brackets for the throttle cables at the throttle bodies. You don’t have to remove the cables at the engine side. However, at the throttle (handlebar), physically remove the cables from the throttle tube. This will allow enough slack to get the cables out of the way for the cam cover. Trust me – if you don’t do this, you will be cursing at it later.
10. After the cam cover is removed, take some paper towel pieces or rags pieces and cover ALL holes in the engine (coolant passages, oil passages, spark plug holes, etc). You don’t want anything falling in there.
11. BEFORE you do anything further, take your cam cover to your bench. Remove the rubber gasket and thoroughly clean/dry both the gasket and the gasket mating surface with some carb spray or similar. Take your High Temp RTV and put a small dab of it in several places along the mating surfaces. Make sure that you put a dab at each of the “corners” where the gasket goes from straight to the “circle” part. The idea here is to use the RTV to “glue" the gasket to the cam cover and let it dry/cure for a few hours before you re-install it. You will use that time to check and/or shim your engine valve clearance. If you don’t do this, then the gasket is going to separate from the cam cover while trying to install it and it is going to drive you nuts. You don’t have enough room to “hold” the gasket in place while you install the cover.
Now – the next tip requires you to make an assumption. If you look at the profile of any camshaft lobe, I believe that half of the lobe is a perfect semi-circle. That semi circle represents the time when the valve is completely closed. This is the time in the revolution when you check the valve clearance. My assumption is that you should be able to check the clearance anywhere within that rotation of the semi circle, and the reading should be the same.
12. You do NOT have to remove the timing cover to simply check the valves. Put the motorcycle in top (5th or 6th) gear. Then simply rotate the rear wheel until the cylinder/cam you are checking has fallen anywhere within the semi-circle part of the lobes. Recognize that the motor might not be in perfect time for that cylinder when you check it, but it won’t matter as the distance (clearance) between the cam and the bucket won’t change as long as you are checking it along the semi-circle.
13. Use ONLY “Go/NO-GO” feeler gauges to check valve clearance. I’ve struggled along the years with the subjective part of checking clearance. Is it a “tight 7” or a “loose 6”? Then I talked with a Yamaha tech (25+ years in the business at that time) and he set my mind at ease. He said that the range of acceptable clearance is given for a reason. Yamaha designed the motor such that if you are at the end of the range, but still within it, then you can go another full maintenance interval without damaging the motor. So use the go/no-go feelers and if it “GOES”, then it’s good.
14. Now – if you find one or more outside of the range, then plan to re-shim as many as you can toward the loosest end of the range. The consensus of opinion is that the valve guide seat is the variable. Either with a carbon deposit, and or wear from repetitive banging, the valve guide seat is where the change in clearance will occur. As the guide seat wears, the clearance should get tighter. So if you adjust to the loosest end of the range (perhaps the loosest 30%), then theoretically, you should get more mileage for your adjustment. The most commonly needed shim for adjustment is 1.85 mm, 1.80 mm, 1.75 mm, and 1.70 mm. You really won't know what you need until you find out what you have, but if you want to take a stab in the dark at having the shims you will most likely need before you start the job, that is my best guess (perhaps 3-5 of each).
15. If it turns out that you need to re-shim the valve clearance, you do not have to remove the camshafts. Instead, simply put the #1 cylinder on TDC, then zip tie both cams to the chain (2 places each), zip tie the crank to the chain (2 places), then loosen the Cam Chain Tensioner, then simply move each camshaft (one at a time) to the side to get access to the shims.
16. Have a telescoping magnet ready to catch the cover bolt for the cam chain tensioner when you remove it. Otherwise, it will fall into the black hole of the motorcycle frame. Be sure to take some painters tape or duct tape and cover up the frame hole after you have loosened the cam chain tensioner. It's amazing how things just find the black hole to fall into.
17. Grind down a long skinny screwdriver to make the width of the blade more narrow. This is to make releasing the cam chain tension easier.
18. You can use a micrometer or dial caliper to calculate the math in order to find the best shim to get you to the loosest part of the range. However, in all the times I’ve done this, I have NEVER been able to go more than 0.05 mm down or up and still stay within the acceptable range. In other words, if you have 1.80 mm shim in the hole, and you need to loosen up the clearance, then a 1.75 mm will work, but a 1.70 mm will be too loose.
19. Don’t forget to remove your paper towels or rags from the holes BEFORE you re-install the cam cover.
20. Use the 2x4 lumber to prop up the fuel tank. After you put everything back together, without the heat shield installed, start the bike and run it up to cycle the coolant fans at least once. Then shut it off and with the tank propped, you can check everything for leaks before you cover everything up.
21. You will need a long neck funnel to fill the coolant. Fill it slowly and in stages to allow as much air as possible to burp out of the radiator neck. After you run the motor, and allow it to cool, you will still need to add a couple of mouthfuls of coolant to top it off.
Tips and Tricks for Checking and Re-Shimming FJR Valve Clearance
Forum rules
13.B - For tech library threads, same approach as the merchandise threads – all posts will be related to the tech library topic – questions about the topic, posts adding to the topic from a technical perspective, etc. Any posts outside of those will be deleted by forum moderators or admins.
13.B - For tech library threads, same approach as the merchandise threads – all posts will be related to the tech library topic – questions about the topic, posts adding to the topic from a technical perspective, etc. Any posts outside of those will be deleted by forum moderators or admins.
-
Hppants

- Contributor
- I post more than I ride
- Posts: 6348
- Joined: Wed Oct 19, 2016 9:22 pm
- FJRModel: 2021ES
- x 12234
- x 10700
Tips and Tricks for Checking and Re-Shimming FJR Valve Clearance
Last edited by Hppants on Mon Sep 21, 2020 1:28 pm, edited 1 time in total.
Jalingo, N4HHE, Toter and 4 others loved this
"I guess it comes down to a simple choice, really. Get busy living. Or get busy dying."
- Andy Dufresne, Shawshank Redemption

- Andy Dufresne, Shawshank Redemption
-
FJRoss

- Veteran
- Posts: 2433
- Joined: Sat Apr 14, 2018 7:41 pm
- FJRModel: 2011 FJR 1300
2017 BMW F700GS - Location: Fredericton NB (Canada)
- x 703
- x 2130
Re: Tips and Tricks for Checking and Re-Shimming FJR Valve Clearance
Good synopsis and very helpful for someone who has not done this before. I do a couple things differently but nothing major. A matter of preference as opposed to right vs wrong.
I have never replaced the coolant drainbolt washer. (copper rather than brass, I think)
Never felt it was necessary to label plug wires since they are all different lengths - IIRC, they are labeled from the factory anyway??
Fresh plugs and coolant - absolutely. The perfect time to change these.
Do a throttle body sync after you are done. The tank is already up and the messing around with stuff might have put the sync off a bit.
I have never needed to replace the timing cover gasket but I always make sure I have one available. Never replaced the valve cover gasket and I use your RTV trick to attach it to the cover. Watch out for the "half moons" when replacing the cover. Loosening the throttle cables at the grip is VERY helpful - I didn't the first time and getting the cover off and on was a bitch!
I use a digital caliper to measure the shims and have been known to use a wet carbide paper on a flat surface to "adjust" the old shims rather than buying new. I don't have a shim kit and the local dealer doesn't necessarily have stock of the ones needed. It is a matter of time waiting to get new shims rather than the cost. Takes maybe 15 minutes per shim... Shims are not case hardened so there is no problem doing this. Digital caliper is much faster than micrometer and sufficiently accurate if you are careful.
I try to get an accurate measurement of the clearances using metric feeler gauges. Go/no go is all that is needed to meet spec and to be safe for the next regularly scheduled check but KNOWING the clearances makes me worry less if the next service is delayed. Also, I like to keep track of clearance changes between checks.
One more thing - there are apparently different "buckets" specs. I assume they are chosen for best fit at the factory. (see item 10 in the following fiche) https://www.yamahasportsplaza.com/oempa ... cb45/valve
Just make sure that you don't switch around the buckets if you are changing shims and you'll be OK.
Thanks for the tips!
Hppants loved this
-
Hppants
- Contributor
- I post more than I ride
- Posts: 6348
- Joined: Wed Oct 19, 2016 9:22 pm
- FJRModel: 2021ES
- x 12234
- x 10700
Re: Tips and Tricks for Checking and Re-Shimming FJR Valve Clearance
Ross - I've tried sanding down shims with some wet 400 grit sandpaper - no luck. Can you please post a link to the paper you use?
"I guess it comes down to a simple choice, really. Get busy living. Or get busy dying."
- Andy Dufresne, Shawshank Redemption
- Andy Dufresne, Shawshank Redemption
-
FJRoss
- Veteran
- Posts: 2433
- Joined: Sat Apr 14, 2018 7:41 pm
- FJRModel: 2011 FJR 1300
2017 BMW F700GS - Location: Fredericton NB (Canada)
- x 703
- x 2130
Re: Tips and Tricks for Checking and Re-Shimming FJR Valve Clearance
400 grit paper would take forever. It isn't like they have to have a mirror finish on them.
I used 240 grit (IIRC) to get them close and then 320 to finish them off a bit. You could go finer after that but there really isn't any need.
Wet paper on a flat surface and figure eight pattern with the shim under index finger. Checking with the digital caliper every couple of minutes. (Also check to make sure the opposite sides remain parallel) I think I used 3M paper but not sure.
I said 15 minutes per shim but probably closer to 10 or less - depends on how much meat needs to be removed.
Hppants loved this
-
Brodie

- Casual Rider
- Posts: 92
- Joined: Thu Aug 24, 2017 9:23 pm
- FJRModel: 2008 Advanced Edition
- Location: San Jose Bay Area
- x 161
- x 170
Re: Tips and Tricks for Checking and Re-Shimming FJR Valve Clearance
Gentlemen,
If you decide to lap an existing shim thinner, then by all means for the sake of the next serviceman to perform this maintenance task, lap the side of the shim that has the thickness etched on it. Truth in advertising!
I have found that the service department has a collection of ‘take out shims’ from previous valve service jobs. This can be a goldmine for finding factory shims which are in between the sizes available at the parts counter/catalogue.
Also, if this is the first time you are lifting the cams to make an adjustment, map out all the shims. Make a pictorial diagram – 4 cylinders, 8 intake shims, and 8 extake shims.
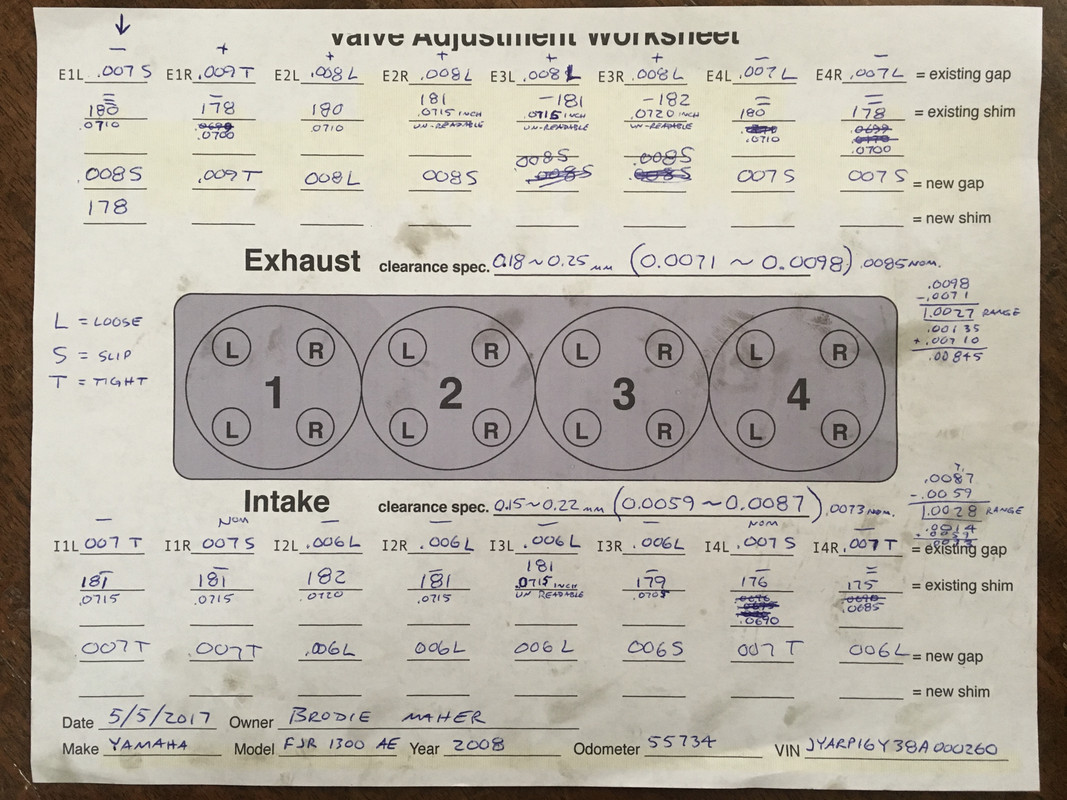
(Yes, I still use the exact clearance method.)
Record the shim measurement for each location. You may get lucky and reduce the number of new shims required by moving existing shims around for optimum clearances within the specification. The main reason for mapping out will become apparent at the next service interval in 26k miles.
Brodie

If you decide to lap an existing shim thinner, then by all means for the sake of the next serviceman to perform this maintenance task, lap the side of the shim that has the thickness etched on it. Truth in advertising!
I have found that the service department has a collection of ‘take out shims’ from previous valve service jobs. This can be a goldmine for finding factory shims which are in between the sizes available at the parts counter/catalogue.
Also, if this is the first time you are lifting the cams to make an adjustment, map out all the shims. Make a pictorial diagram – 4 cylinders, 8 intake shims, and 8 extake shims.
(Yes, I still use the exact clearance method.)
Record the shim measurement for each location. You may get lucky and reduce the number of new shims required by moving existing shims around for optimum clearances within the specification. The main reason for mapping out will become apparent at the next service interval in 26k miles.
Brodie

Toter, Hppants, and wheatonFJR loved this
Professionals: built The Titanic
Amateurs: - With God’s Blessing - built the Ark.
Which boat would you rather to sail on?
Amateurs: - With God’s Blessing - built the Ark.
Which boat would you rather to sail on?
-
FJRoss
- Veteran
- Posts: 2433
- Joined: Sat Apr 14, 2018 7:41 pm
- FJRModel: 2011 FJR 1300
2017 BMW F700GS - Location: Fredericton NB (Canada)
- x 703
- x 2130
Re: Tips and Tricks for Checking and Re-Shimming FJR Valve Clearance
I found a Dropbox link to Yamafitter's valve check and adjustment Excel spreadsheet. The original link at the other sandbox doesn't work anymore.
https://www.dropbox.com/s/fs9l4n6t5ypln ... 2.xls?dl=0
Not sure who owns the Dropbox but the file can be downloaded to use on your computer (as long as you have Excel or compatible spreadsheet program like Libre Office).
Separate spreadsheet tabs for metric or Imperial measurement.
This works great and can be printed/saved for future reference.
Toter, Hppants, and wheatonFJR loved this
-
Brodie
- Casual Rider
- Posts: 92
- Joined: Thu Aug 24, 2017 9:23 pm
- FJRModel: 2008 Advanced Edition
- Location: San Jose Bay Area
- x 161
- x 170
Re: Tips and Tricks for Checking and Re-Shimming FJR Valve Clearance
I'm sure that Yamafitter's EXCEL spreadsheet is 'EXCELANT', however, for those who would rather not download and use EXCEL, for whatever reason, this is what I have made for my own use, just copy and print out as many as you need:
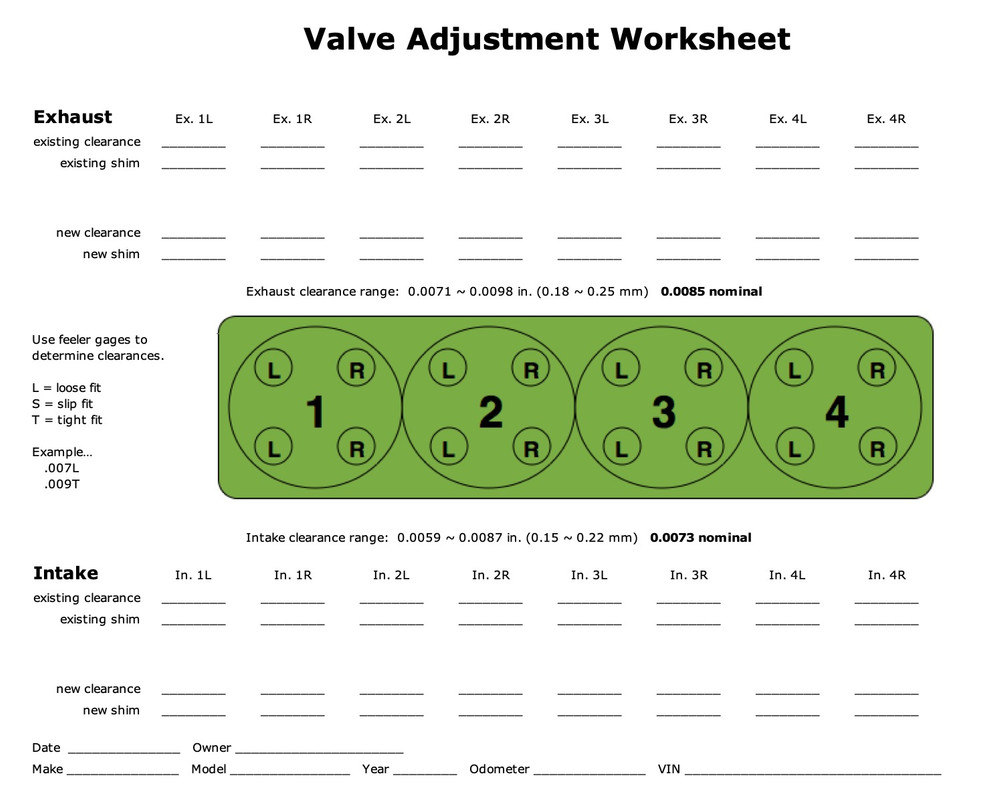

Some of us are rather old fashioned; kinda like being a constipated mathematician, we gotta work things out with a penc...

Never mind!
Brodie

Some of us are rather old fashioned; kinda like being a constipated mathematician, we gotta work things out with a penc...

Never mind!
Brodie

Last edited by Brodie on Sat Sep 12, 2020 4:16 pm, edited 3 times in total.
Toter, Hppants, and wheatonFJR loved this
Professionals: built The Titanic
Amateurs: - With God’s Blessing - built the Ark.
Which boat would you rather to sail on?
Amateurs: - With God’s Blessing - built the Ark.
Which boat would you rather to sail on?
-
Brodie
- Casual Rider
- Posts: 92
- Joined: Thu Aug 24, 2017 9:23 pm
- FJRModel: 2008 Advanced Edition
- Location: San Jose Bay Area
- x 161
- x 170
Re: Tips and Tricks for Checking and Re-Shimming FJR Valve Clearance
Many thanks to the original poster, Hppants, for his insights/grey hairs concerning this rather involved process.
If you're new to the bike and think it may be above your abilities... well, if you can comfortably swing a wrench, and have the desire and the facilities (an open carport may not be the best location), it is quite do-able, there are no black arts to this. The nice thing is you have help on these forums – just ask, and the smart fellers will be glad to share their experiences to coach you along.
After performing several maintenance intervals, and documenting the work performed, a worthwhile goal would be to maintain a summary sheet.
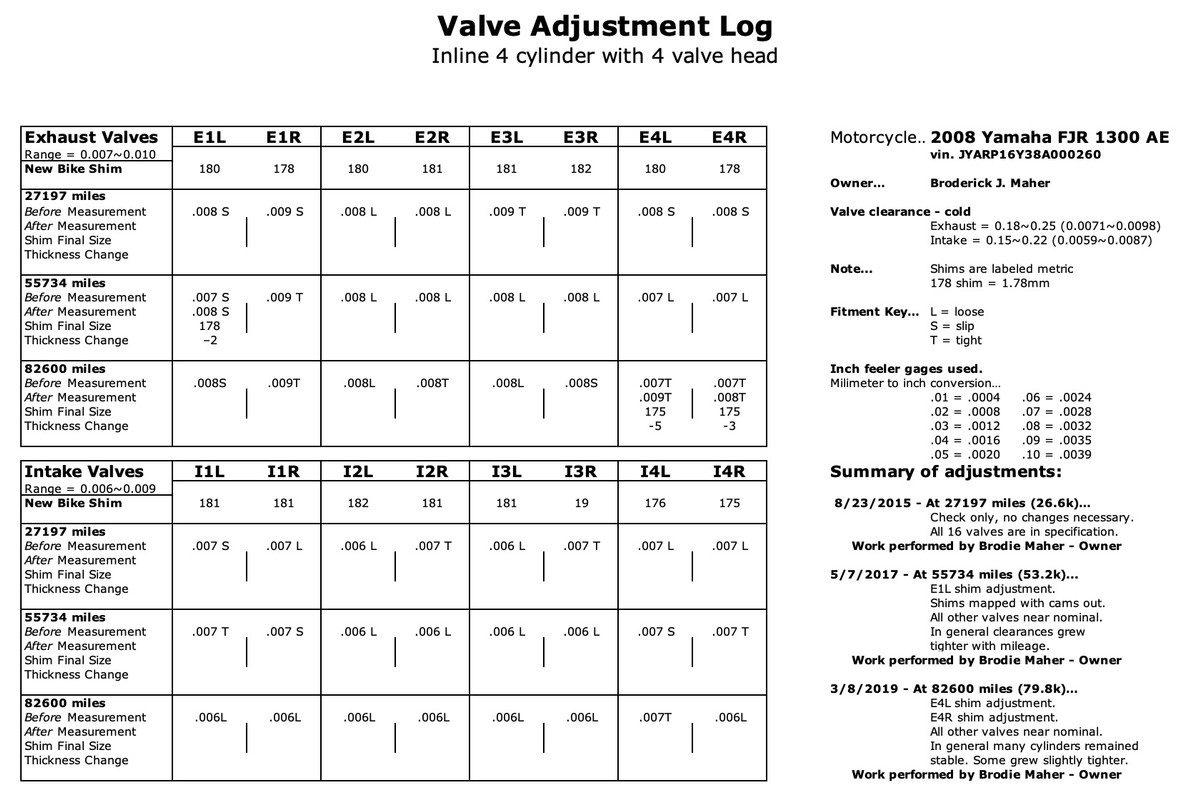
This helps when performing the next maintenance interval, and would also be valuable when comes time for selling the bike
Brodie

If you're new to the bike and think it may be above your abilities... well, if you can comfortably swing a wrench, and have the desire and the facilities (an open carport may not be the best location), it is quite do-able, there are no black arts to this. The nice thing is you have help on these forums – just ask, and the smart fellers will be glad to share their experiences to coach you along.
After performing several maintenance intervals, and documenting the work performed, a worthwhile goal would be to maintain a summary sheet.
This helps when performing the next maintenance interval, and would also be valuable when comes time for selling the bike
Brodie

Hppants and wheatonFJR loved this
Professionals: built The Titanic
Amateurs: - With God’s Blessing - built the Ark.
Which boat would you rather to sail on?
Amateurs: - With God’s Blessing - built the Ark.
Which boat would you rather to sail on?
-
raYzerman

- Contributor
- I post more than I ride
- Posts: 9222
- Joined: Mon Mar 18, 2013 10:49 am
- FJRModel: 2016 Versys 1000 Titanium Devil, 2014 DL1000, 1999 VFR 800 Bumble Bee
- Location: Millgrove, Ontario, CA
- x 2876
- x 10697
Re: Tips and Tricks for Checking and Re-Shimming FJR Valve Clearance
A few additional notes.......
Brodie computes it manually then puts it in a spreadsheet anyway... just a chuckle.
To enhance Pants list:
If you remove the timing cover carefully, you'll keep the gasket intact and you can fix a spot or two with RTV if you need to. When you remove the cover, the dowel in the cam chain guide may come out... ensure that is back in place before you start the check so chain tension is maintained.
4 - unnecessary to label the coils, they are universal.
5 - put a little of your grease on the tabs near the tips as well.
7 - handy tool everyone should have is a manual impact driver, 1/4" drive is fine, 3/8 more useful.
8 - hose clamp is a 6mm socket
12 - Using timing marks is less awkward than the rear wheel method and takes less time. Set per FSM, both intakes and exhausts can be checked at the same time.
13 - I have had difficulty finding go/no go feelers. I prefer bent offset imperial feelers with metric equivalent values on them. Prefer using metric calculations (per the spreadsheet) for shims.
14 - The valve guides guide the valve shaft. The valve clearances change due to wear of valve head to seat, i.e, depth to seat.
Shims are available in quarter sizes, e.g.. 1825, 1775 - order from Rocky MOuntain ATV. If you do not have a fully stocked shim kit available, allow extra time to order the shims you need.
My latest philosophy is, if I have to pull a cam, I will reshim everything to 70% of max. and as close to each other as possible. With all the valves uniform and when a TB sync is done, vibrations issues will improve. Side benefit is you may never need to do another valve check, as the wear is so small and slow. My butt dynometer says the bike runs better. Consider doing it at your first valve check and be done with it......
Auburn and Brodie loved this
Keep yer stick on the ice........... (Red Green)
Duct tape can't fix stupid, but it can sure muffle the sound.
Duct tape can't fix stupid, but it can sure muffle the sound.
-
FJRoss
- Veteran
- Posts: 2433
- Joined: Sat Apr 14, 2018 7:41 pm
- FJRModel: 2011 FJR 1300
2017 BMW F700GS - Location: Fredericton NB (Canada)
- x 703
- x 2130
Re: Tips and Tricks for Checking and Re-Shimming FJR Valve Clearance
Just to add to that - Most of the shims I have found (or needed) are within a fairly short shout of 180 (1.8 mm). Can't remember for sure but I don't think I found any less than 165 or greater than 190. Shim "kits" that are available have a huge range of sizes (120 to 350) but typically three (or fewer) in each size, most of which you will never use, at least not on the FJR. Some shops will exchange shims from their "used" stock which may be a possibility if mail-ordered shims are a week or more away. Other alternative is to sand your existing shims to the desired thickness.Shims are available in quarter sizes, e.g.. 1825, 1775 - order from Rocky MOuntain ATV. If you do not have a fully stocked shim kit available, allow extra time to order the shims you need.
...13 - I have had difficulty finding go/no go feelers. I prefer bent offset imperial feelers with metric equivalent values on them. Prefer using metric calculations (per the spreadsheet) for shims.
Anybody have any experience finding or needing shims far outside this range?
(I use a set of metric feeler gauges and metric calculations in the Yamafitter spreadsheet)
-
BkerChuck
- Veteran
- Posts: 1705
- Joined: Mon Oct 31, 2016 7:02 am
- FJRModel: 2014 FJR1300A
- x 2357
- x 2796
Re: Tips and Tricks for Checking and Re-Shimming FJR Valve Clearance
To add to the collective knowledge here....coolant tube O-rings are a 2-116 N70 buna. I work for a hydraulic shop and so get these at cost. I had our parts manager verify size. If you have a shop near you offering hydraulic seals and gaskets these are super inexpensive. Avoid Harbor Freight as their size tolerances are too great. I think I'm paying about .03 each compared to OEM at around $1.50?
wheatonFJR loved this


IBA #50866
-
1911

- Veteran
- Posts: 865
- Joined: Mon Oct 07, 2013 9:44 am
- FJRModel: 2007
- Location: Laurens SC
- x 371
- x 2007
Re: Tips and Tricks for Checking and Re-Shimming FJR Valve Clearance
Some pretty good stuff here that Pants started. Maybe the best twelve bucks I 've spent on maintenance-got a fuel line from Ebay and added some rubber in the middle. Makes TB sync and other undertank work a breeze
plus enables injector test and spray pattern view using diag mode on the dash
plus enables injector test and spray pattern view using diag mode on the dash
Toter, dcarver, Hppants and 1 others loved this

-
raYzerman
- Contributor
- I post more than I ride
- Posts: 9222
- Joined: Mon Mar 18, 2013 10:49 am
- FJRModel: 2016 Versys 1000 Titanium Devil, 2014 DL1000, 1999 VFR 800 Bumble Bee
- Location: Millgrove, Ontario, CA
- x 2876
- x 10697
Re: Tips and Tricks for Checking and Re-Shimming FJR Valve Clearance
Extending a fuel line is genius.... shoulda done that years ago for all those tech days......
Keep yer stick on the ice........... (Red Green)
Duct tape can't fix stupid, but it can sure muffle the sound.
Duct tape can't fix stupid, but it can sure muffle the sound.
-
Hppants
- Contributor
- I post more than I ride
- Posts: 6348
- Joined: Wed Oct 19, 2016 9:22 pm
- FJRModel: 2021ES
- x 12234
- x 10700
Re: Tips and Tricks for Checking and Re-Shimming FJR Valve Clearance
LOVE both of those tips, Duane.
I think next valve check, I'll tackle removing the air box so that I can clean the intake side of the TBs.
I think next valve check, I'll tackle removing the air box so that I can clean the intake side of the TBs.
"I guess it comes down to a simple choice, really. Get busy living. Or get busy dying."
- Andy Dufresne, Shawshank Redemption
- Andy Dufresne, Shawshank Redemption
-
yamafitter

- Veteran
- Posts: 719
- Joined: Fri Mar 08, 2013 5:33 pm
- FJRModel: 06AE
- Location: Outside of Toronto therefore off the edge of the world.
- x 74
- x 626
Re: Tips and Tricks for Checking and Re-Shimming FJR Valve Clearance
This is my dropbox so it will be there for as long as I have a computer.FJRoss wrote: ↑Sat Sep 12, 2020 3:45 pm I found a Dropbox link to Yamafitter's valve check and adjustment Excel spreadsheet. The original link at the other sandbox doesn't work anymore.
https://www.dropbox.com/s/fs9l4n6t5ypln ... 2.xls?dl=0
Not sure who owns the Dropbox but the file can be downloaded to use on your computer (as long as you have Excel or compatible spreadsheet program like Libre Office).
Separate spreadsheet tabs for metric or Imperial measurement.
This works great and can be printed/saved for future reference.
Fishin VA, FJRoss, and wheatonFJR loved this
-
wheatonFJR

- Contributor
- I post more than I ride
- Posts: 19774
- Joined: Wed Jan 16, 2013 6:10 pm
- FJRModel: 2013-Jwilly Special LD Delivery
- Location: Travelers Rest
- x 40707
- x 17999
Re: Tips and Tricks for Checking and Re-Shimming FJR Valve Clearance
Yay Yamafitter!!yamafitter wrote: ↑Wed Jul 07, 2021 7:09 pmThis is my dropbox so it will be there for as long as I have a computer.FJRoss wrote: ↑Sat Sep 12, 2020 3:45 pm I found a Dropbox link to Yamafitter's valve check and adjustment Excel spreadsheet. The original link at the other sandbox doesn't work anymore.
https://www.dropbox.com/s/fs9l4n6t5ypln ... 2.xls?dl=0
Not sure who owns the Dropbox but the file can be downloaded to use on your computer (as long as you have Excel or compatible spreadsheet program like Libre Office).
Separate spreadsheet tabs for metric or Imperial measurement.
This works great and can be printed/saved for future reference.
There's no better therapy than a ride - petey